Products
Solutions
Resources
9977 N 90th Street, Suite 250 Scottsdale, AZ 85258 | 1-800-637-7496
© 2024 InEight, Inc. All Rights Reserved | Privacy Statement | Terms of Service | Cookie Policy | Do not sell/share my information

In this topic, you will create a new component from scratch in InEight Plan.
In InEight Control, a direct cost item (WBS phase codes) has a quantity that is the sum of many components with smaller quantities which are created in InEight Plan. For example, a structural steel cost item measured in tons is made up of many pieces of steel, each with a specific weight (in tons). When claiming work complete, you could calculate the weight of each piece of steel installed and claim that much at the WBS level.
If you did this, how would you know what work is complete and what specific work is remaining?
What have you already claimed and what have you not?
What if a Foreman doesn’t have the time to weigh each piece of steel before installing, or what if he weighs incorrectly?
Components allow you to break down the WBS quantity into smaller, more manageable sub items for claiming. When you claim components, you can easily see what specific items have been completed and what is remaining. You do not have to guess at what has already been claimed to date. Foremen do not need to do any calculating in the field; they simply report the components they completed. Components already have an assigned quantity based on takeoff calculations.
Can you think of how components would help claiming of other disciplines like Pipe, Electrical, or Concrete?
How are these disciplines measured vs how is the work performed?
Components aim to bridge that gap.
There are several types of components in the Quantity Tracking module:
Activity
Material
You can create activity, material, and assembly components directly in Plan. Contract components can only be created indirectly from InEight Contract.
These different types let you claim procurement activities and construction activities separately. To do this, material cost and labor cost must be broken out in separate WBS codes. If that is the case, you can add the same steel components as activity components and material components as pictured below:

When you create components for both the material and activity, you can then earn hours based on a unit rate for the activity, and earn dollars based on material unit cost for the material and assign them to two separate WBS codes.
Component types are shown with different color schemes:
Activity: Blue
Material: Gray
Contract: Metallic purple
Assembly: Forest green
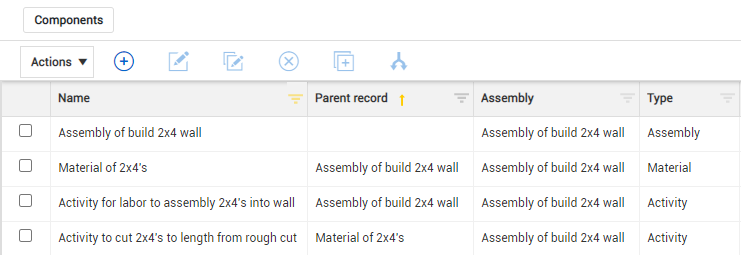
You can combine activity and material components into assembly components. An assembly allows claiming to roll up into one parent record.
For example, if you are building a wall using 2x4s, you might have the following components:
If you create a new assembly component to build a 2x4 wall, you can set the parent record of the material and labor activities to be the assembly. If you set the parent record of the cutting activity to be the material, the cutting activity also becomes part of the assembly. Using assembly components and parent records lets you create hierarchies of components so that claiming rolls up into one record. The new Assembly column shows which assembly each component belongs to.
When you edit an assembly or material component, you can use the Related Components tab in the slide-out panel to associate existing components. Only associated components lower in the hierarchy are shown.
You can only add associations from the Related Components tab. To remove an association, you must edit the Parent record field of the associated component.
Contract components cannot be created directly in Plan. A Schedule of Values (SOV) item from Contract automatically becomes a contract component in Plan if the SOV is not set to hide in Plan and Progress.
In Quantity tracking, a contract component's basic details from Contract cannot be edited. You can associate a contract component to an assembly.
You can assign a contract component to a claiming scheme by adding a claiming scheme to the Contract discipline in Actions > Manage claiming schemes. You can then edit a contract component to change the claiming scheme. A contract component can only be in the Contract discipline. See Claiming Scheme Creation for more information on how to add a claiming scheme.
There are four methods for creating activity, material, and assembly components:
|
Component Creation |
|
|---|---|
|
From Scratch |
Create each component manually using the new component slide out panel. |
|
Import Template |
Import multiple components into InEight Plan simultaneously. |
| Copy | Create one new component from an existing component. |
| Split | Create multiple new components from an existing component. |
When creating components, a number of fields called attributes are available to be filled out. It is not necessary to fill out every single field, but the more information input, the better. Attributes help make tracking components easier. In many cases, depending on the size of the job, you may have hundreds of thousands of components. In such a case, it can be difficult at times to distinguish the differences between components if only a few attributes are filled out.
You will rely heavily on certain component attributes for reporting purposes. For these attributes, it is important that data integrity is maintained.
For example, the area and system fields are commonly used for reporting. For these fields, it is important that the area and system entered are always spelled and formatted exactly the same way every time. Imagine a scenario where the data entered for the area field is spelled and formatted five different ways by five different users. In this case, when a report is run for areas, the report will only identify the data that is spelled and formatted one of the five ways. All data for the other four will be left out and your report will be missing crucial information.
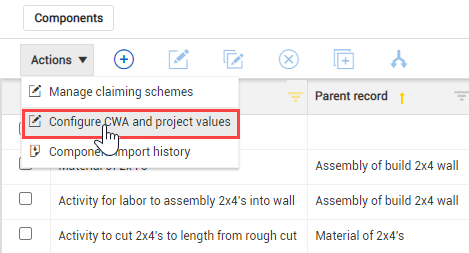
To solve this problem, validated fields are used. Validated fields are simply a pre-defined list of values that populate into a drop-down menu. Instead of making these fields free text fields, a drop-down list is utilized. This drop-down list is maintained in the Configure CWA and project values page. You access the Configure CWA and project values page from the Actions menu on the Components page in Quantity tracking.
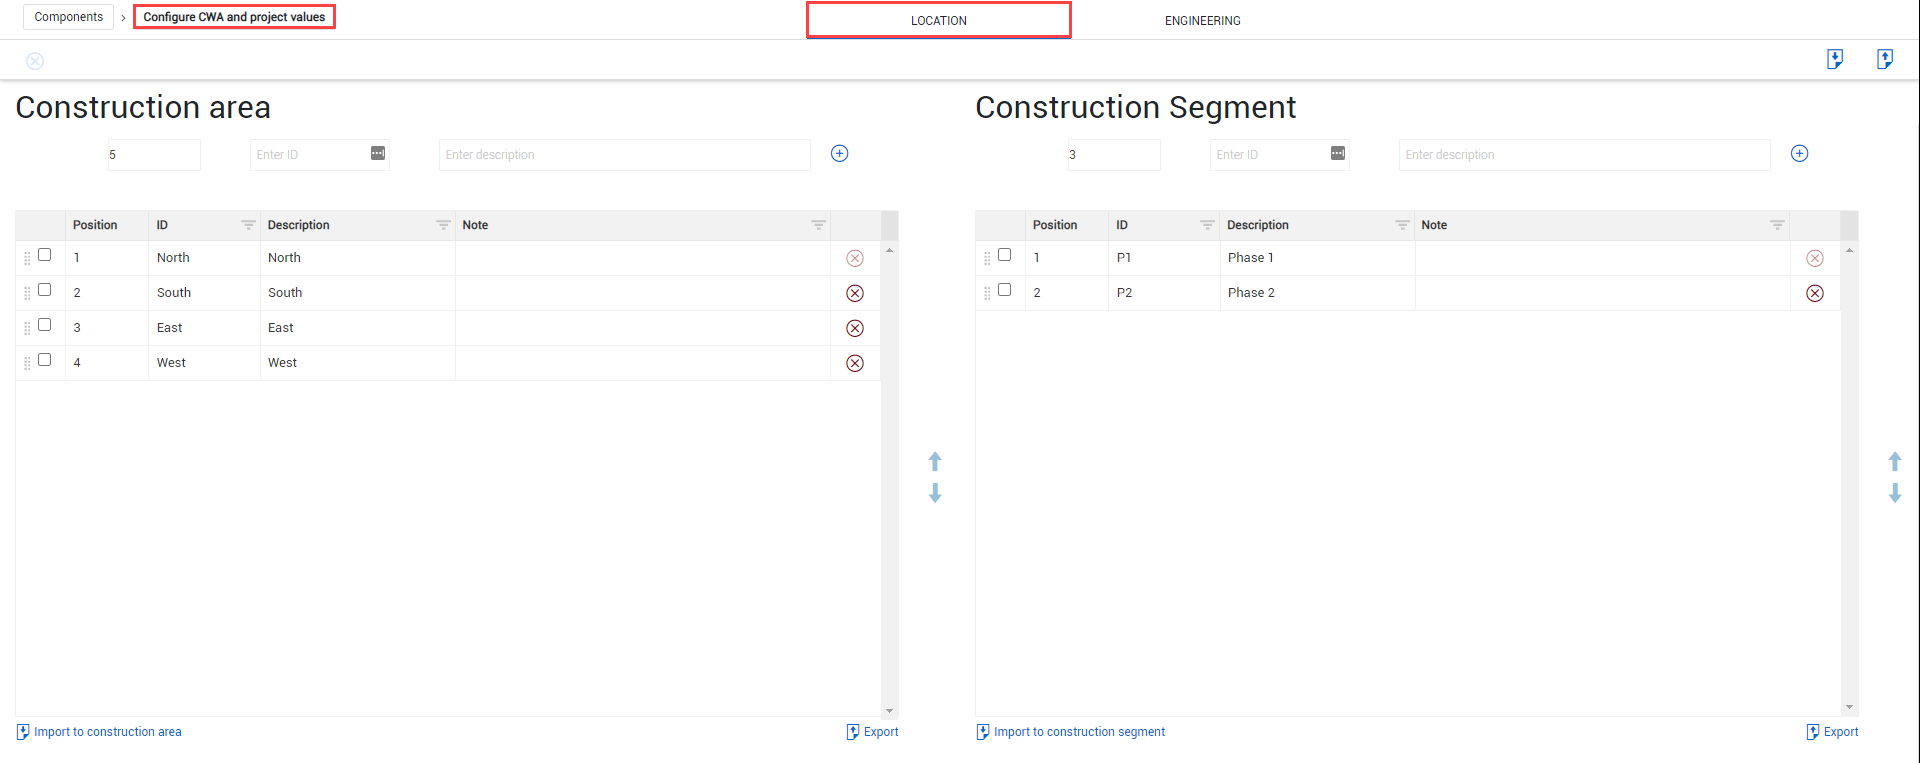
In the Location section of the Configure CWA and Project Values page, you can add a construction areas, construction segments, and commodities as data validated tag values to assign to components. Examples of construction areas are North and South. An example of a construction segment is Phase 1. Examples of commodities are rebar and steel. These can then be used to map your components for reporting.
Depending on how your project is set up, if you assign a component to a work area in Work packaging, the component's location is updated to match the work area and cannot be edited in Quantity tracking. The setting that controls this behavior is called Automatically inherit CWA to component from assigned work package.
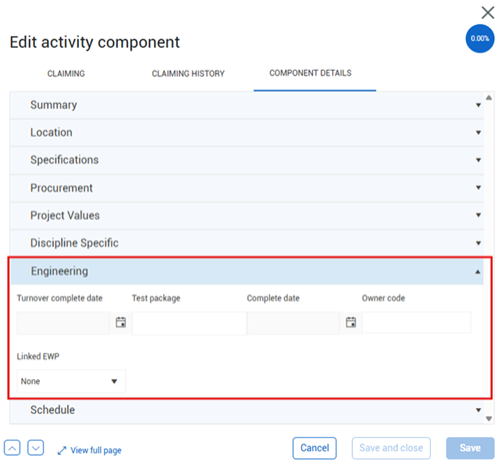
In the Engineering section of the Configure CWA and Project Values page, you can associate turnover packages and systems of work such as fire, water, or sprinkler to a component. You can further define subsystems for a component. Depending on your permissions, you might not be able to edit component attributes, which are typically maintained by an administrator. If you need the drop-down list for a validated field update and do not have access, contact your system administrator.
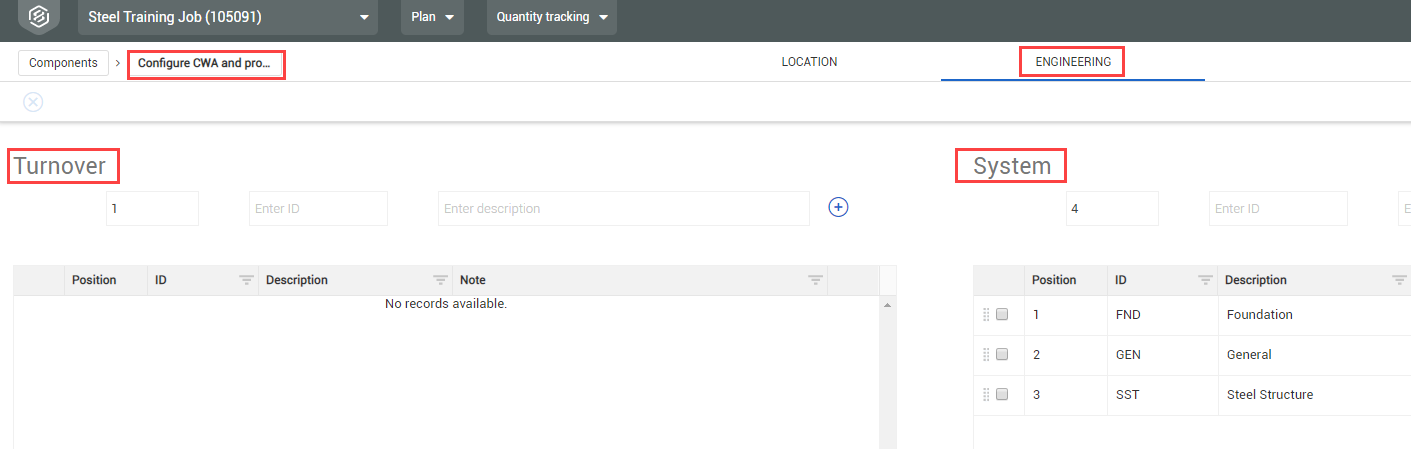
The Engineering section in the Edit activity component > Component Details tab also lets you link InEight Design data to a plan component. You can enter or update the turnover complete date, test package, complete date, and owner code.
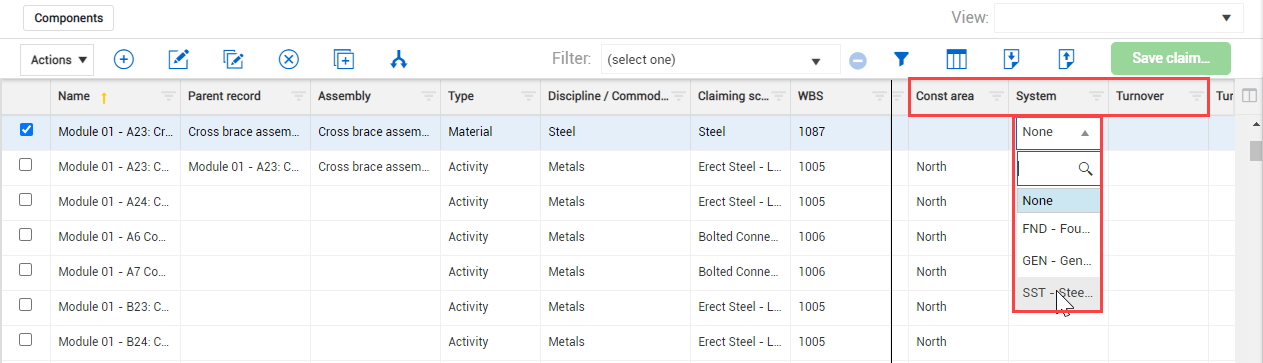
On the Quantity tracking Components page, you can add the component attribute columns to your view. Clicking into a field under one of the component attribute columns provides the drop-down values for the attribute as defined previously on the Configure CWA and Project values page.
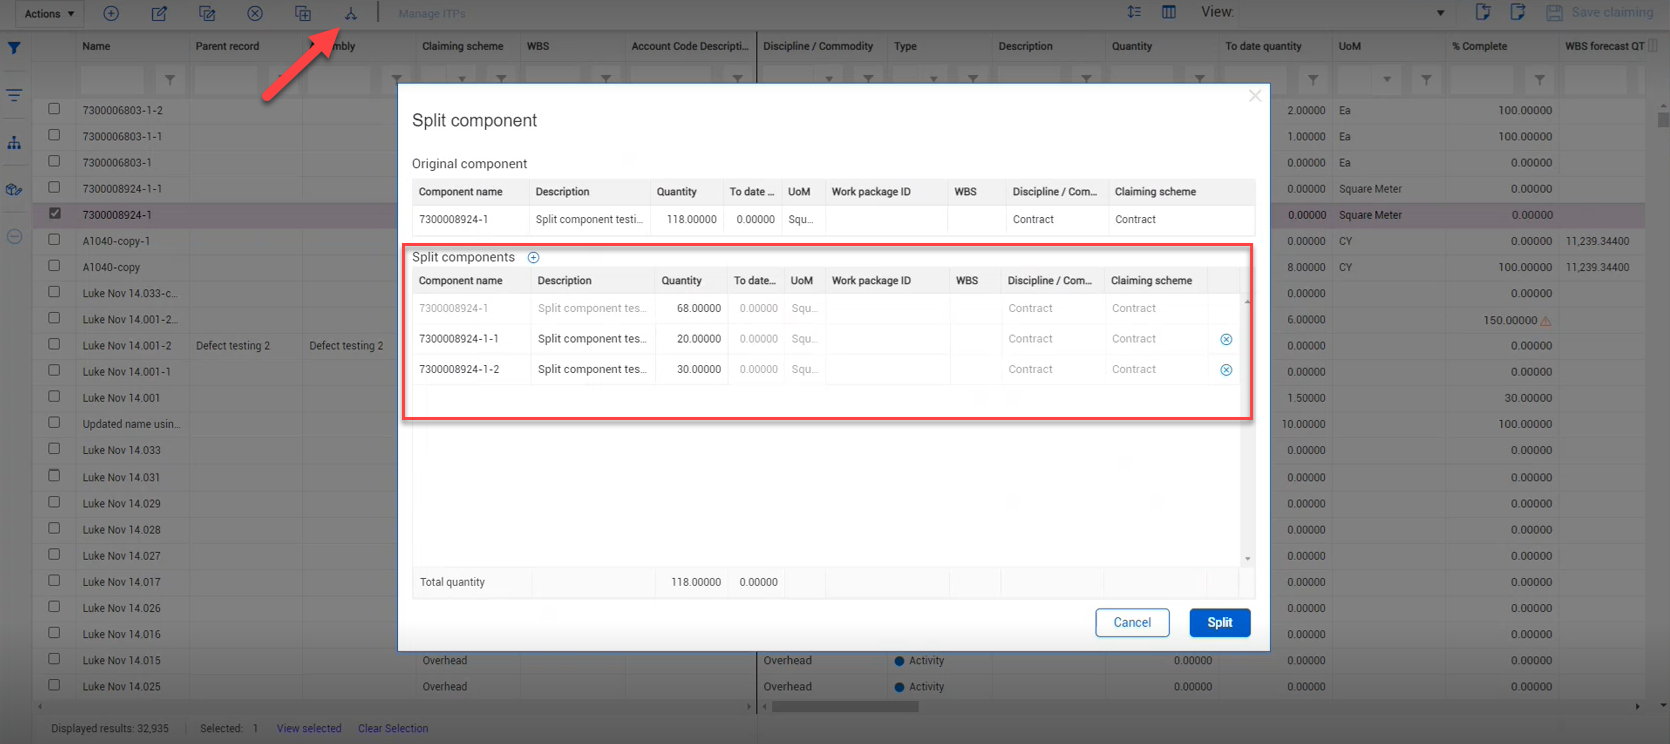
You can split a contract component into new smaller components. In Quantity tracking you can select a single component, and then click the Split component icon. The Split component dialog box opens. You can split the original component to up to 50 new components. You can apply quantity to the new components. The original component (line 1 in the split component window) will have its quantity reduced.
The original component cannot be set to a value less than zero. If all the quantities are associated to the split components, then the lowest value the original component can be set to is zero.
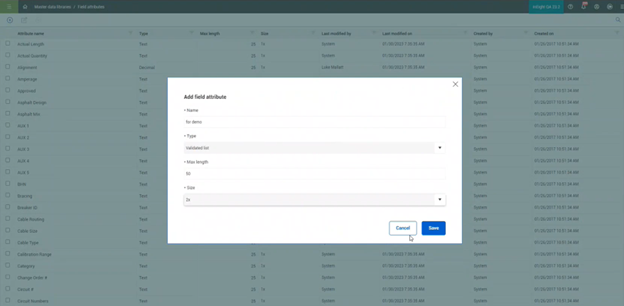
The Field attributes drop-down list is found under the Discipline Specific section of the Edit activity components dialog box.
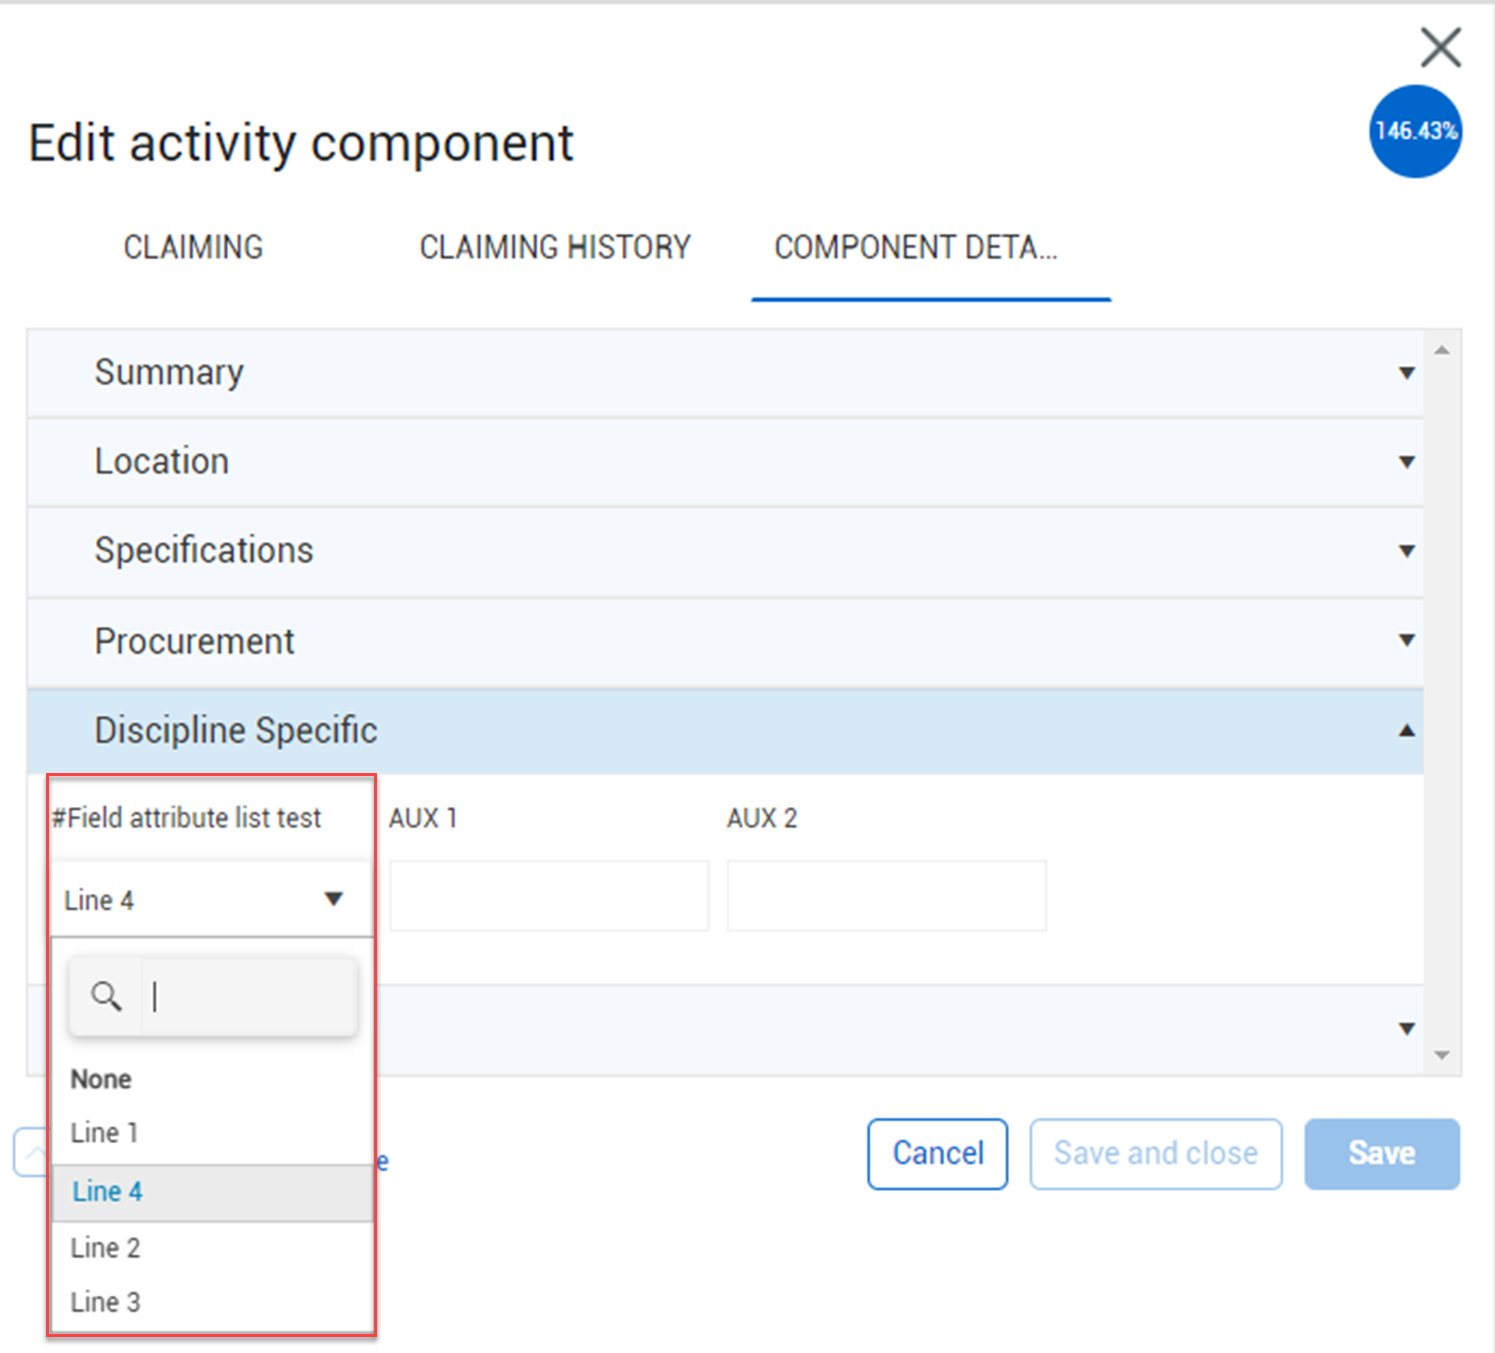
To create the validated lists, go to Platform> Master data libraries> Attributes and then click the Add attribute icon. The Add attribute dialog box opens, enter the attribute information. In the Type field, select Validated list. After you save the attribute, it shows on the Field attributes page.
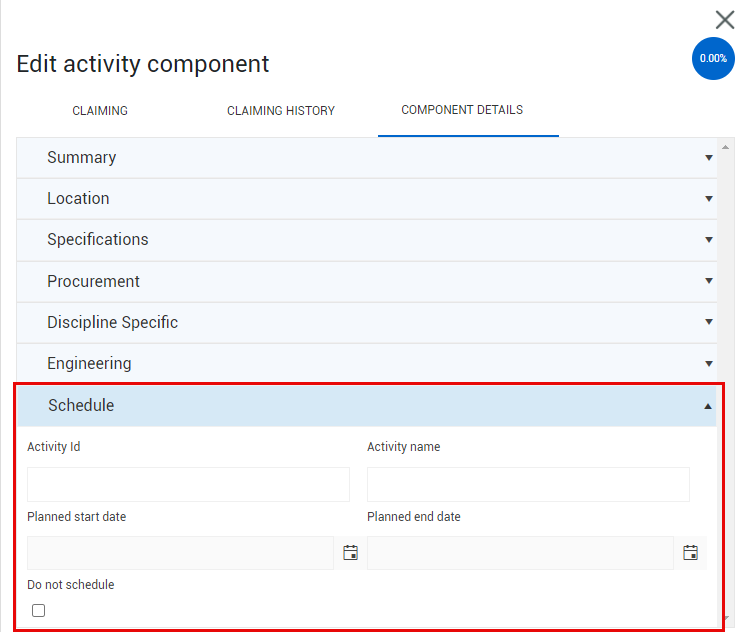
The Schedule section in Edit activity component > Component Details tab lets you manage schedule details directly from an activity component. You can enter or update the Activity ID, Activity name, Planned start date, and Planned end date of a schedule. You can enter free-form text or search existing data. If an existing Activity ID is selected, all other fields are populated with any data from InEight XER imports. The Do not schedule check box integrates information from InEight Design.
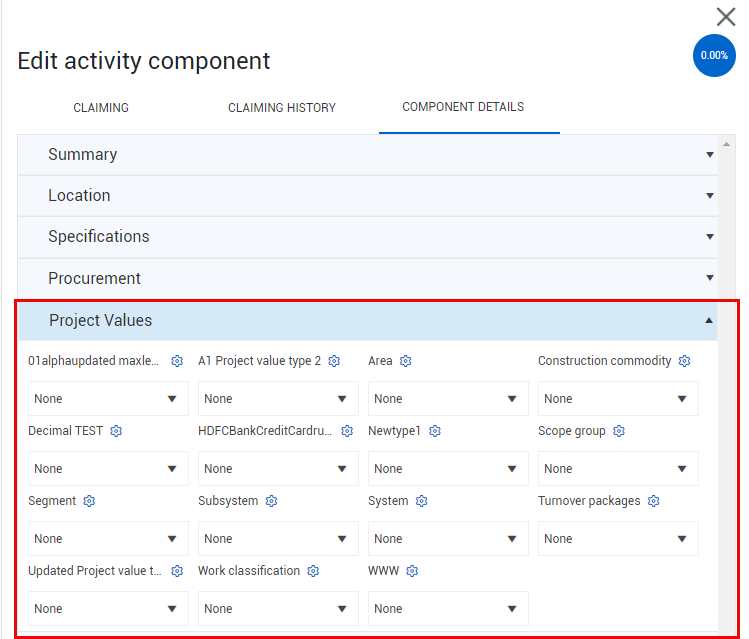
Assigned project value types are created in the master data library, they can be linked to a project, which then lists the project values in quantity tracking. Go to Quantity Tracking > Column chooser to add the project values to your grid view.
|
Title |
Description |
|
|---|---|---|
|
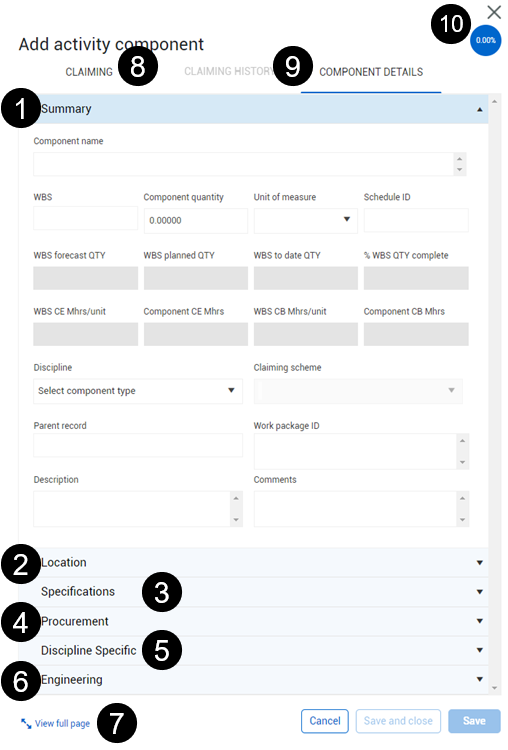
1 |
Summary Menu |
Contains general high-level component information such as Name, WBS, Quantity, Unit of Measure, and Discipline. |
|
2 |
Location Menu |
Contains exact location information of the component such as Building, Elevation, Construction area, and System. |
|
3 |
Specifications Menu |
Contains information regarding exact specification for the component such as: Size, Weight, Thickness, Material code, and External link. |
|
4 |
Procurement Menu |
Contains information regarding the procurement of the component such as Supplier, PO #, and Shop/Field. This section also shows related contract information for contract components.. |
|
5 |
Discipline Specific Menu |
Contains information that is specific to the discipline selected in the summary menu. This is different for every discipline. |
|
6 |
Engineering |
Contains information regarding the engineering of the component such as Turnover, Test Package, and Owner Code. |
|
7 |
Claiming Scheme Menu |
Shows the claiming scheme selected in the summary menu. |
|
8 |
Claiming History |
Shows a log of what has been claimed to date for this component and by whom. |
|
9 |
View Full Page Link |
Opens the slide-out panel into a separate window and expands all menus. Allows for scrolling through the menus instead of opening accordions individually. |
|
10 |
% Complete Field |
Shows overall percent complete of the component. |
The following step by step walks you through how to create a component from scratch.
From an open project, go to the Quantity Tracking module.
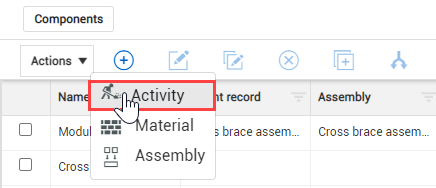
To create a component, select the Add icon on the left toolbar.

Select Activity.
This opens the new activity component slide out-panel. By default, the summary accordion menu should be expanded
In the Summary menu, enter your component details.
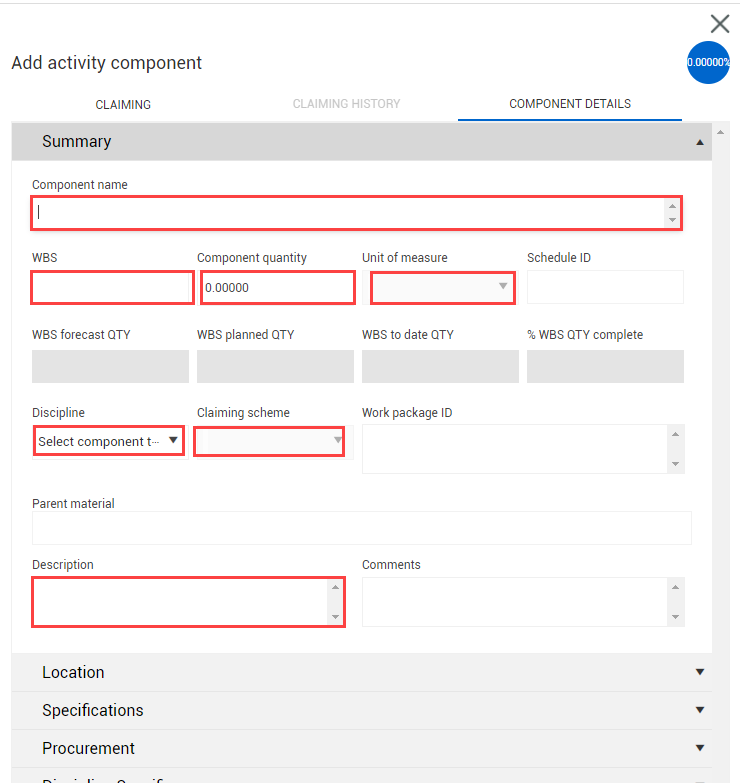
Depending on what project setting you have set up, when you assign your WBS, the Unit of Measure, Discipline, and Discipline/Claiming Scheme fields might be automatically populated and locked for editing.
You can associate material components and assembly components to activity components by adding materials or assemblies to the Parent record field. To associate materials, check that you have the setting Associate Claiming to Material Components turned on in your Project Settings > Plan Quantity Tracking.
Open the Location menu by clicking on the Location title header.
In the Location menu, enter the location and commodity information.
Open the Discipline specific menu and enter your grade and coating information.
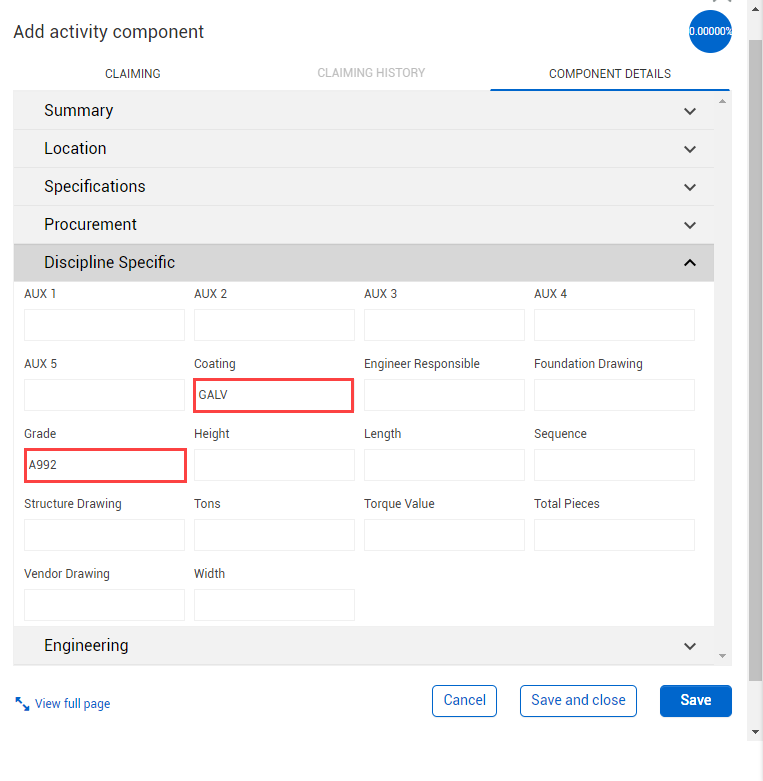
After you have completed filling out your information, click Save.
The following Step by Step walks you through how to create a component by copying an existing component.
Select a component.
The Copy function only works when you select a single component.
Click the Copy icon in the upper-left of the page.
The Copy component dialog box opens
Enter a name for the new component.
The default name adds -copy to the end of the original component’s name
The following Step by Step walks you through how to create multiple components by splitting an existing component.
Select a component.
The Split function only works when you select a single component.
Click the Split icon in the upper-left of the page.
The Split component dialog box opens
Click the Add icon next to Split components to increase the number of new components to split the original into.
To remove a split component, click the Remove icon next to the component.
Enter names for the split components.
The default names add -n to the end of the original component’s name, where n is an increasing number starting at 1
The following Step by Step walks you through how to edit multiple components at the same time.
Select multiple components.
You can edit a maximum of 50 components at the same time.
Click the Bulk edit icon in the upper-left of the page.
The Bulk edit dialog box shows
In the dialog box, select a column and enter a new value for the column.
Add or remove additional columns as necessary, and then click Save.
You can edit a maximum of five columns at the same time.
The Bulk delete components option in the Actions menu lets you delete up to 500 components at a time. The components must have zero claimed quantity to be deleted. Components with installed quantity are never deleted, so only the first 500 zero-quantity components can be deleted. To help target specific components, bulk delete will work when filters are applied and only values with the selected filters will be deleted.
The following Step by Step walks you through how to delete components with zero claimed quantity in bulk.
Open the Actions drop-down menu, and then select Bulk Delete Components.
A warning dialog box opens.
Select the confirmation check box.
Click Delete.
Additional Information
9977 N 90th Street, Suite 250 Scottsdale, AZ 85258 | 1-800-637-7496
© 2024 InEight, Inc. All Rights Reserved | Privacy Statement | Terms of Service | Cookie Policy | Do not sell/share my information